All callouts on the map Inferno in CS:GO

The map Inferno is still one of the most widespread if we consider only CS GO matches on the competitive scene. After many years and serious stylish polishes, the map saved its initial structure, which is familiar to many old-school players. Of course, the majority of callouts appeared back in CS 1.6, however, the map is still rich with interesting details nowadays.
The main feature of the map Inferno is a limitation in space, which is combined with many corners. Due to this, the map has enough positions, each of which has its name.
We continue our series of materials dedicated to callouts on famous CS:GO maps. It is time for Inferno, the Italian location, which is familiar to every player and is popular in the community. Since the map is close to the balance of the sides, the review of all callouts on Inferno will be twice as useful for those who want to improve communication and become stronger in terms of team play.
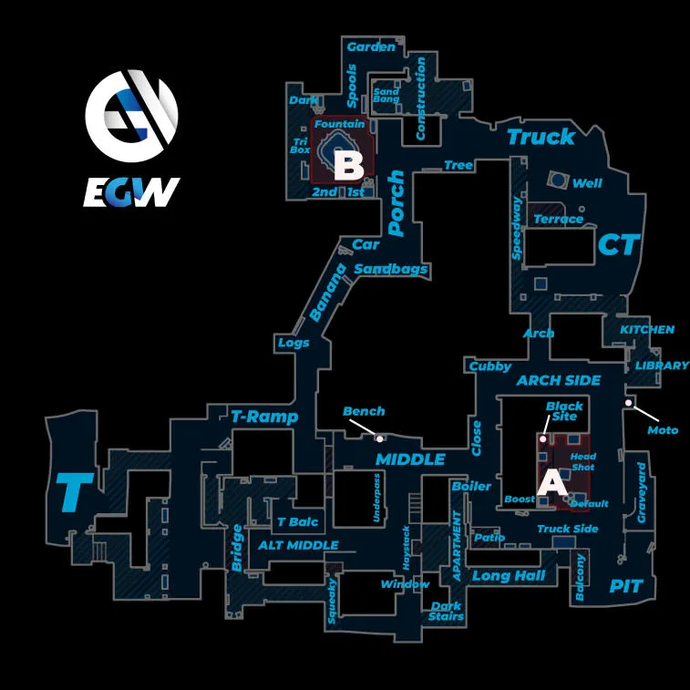
T-Spawn and Mid
Let’s start the review of the callouts, like before, from the perspective of the attacking players. In this case, we will begin with the respawn point of the attacking team and move to the middle of the map, which is represented in two options in the case of the map Inferno.
- T-Spawn: A place where the attacking side players spawn.
- Radio: A position that marks a small point located at the exit to the second mid. It was called in the name of the radio that plays a voice message during a round.
- Zero: This place is located right after the exit from the T-Spawn. It is a connecting element between a lift to the room and the T-Ramp.
- Ledge: A small ledge is located at the T-Ramo and is a common place for a sniper who controls the exit of the defensive players from the top mid.
- T Ramp: A position, from which the attacking players go out to the first mid or open the Banana. It is a small slope in front of which a view of the center of the map opens.
- 1st Mid: The general title of the first middle of the map, which leads to the top mid.
- Living Room: The location is in a small building and leads to the apartment through the bridge.
- Balcony: It is an open ledge, which is located near the living room. You can jump off to the second mid or the underpass.
- Bridge: The position is a bridge that connects the T Apartments and the living room.
- 2nd Mid: The general title of the second middle of the map that is connected with the T Apartments.
- T Apartments: It is an interconnected corridor located after the bridge.
- Mid Door: This position is a door located in the T Apartments.
- Back Alley: A space that connects the upper apartments and the corridor of the attacking players.
- Stairs: A ladder that leads to the upper apartments from the second mid.
- 6: It is a space connecting both middles of the map. It usually denotes the area under the window.
- Window Stairs: A small stair from which a boost is made to the boiler window.
- Underpass: The underground corridor connects the two middles of the map.
- Bottom Mid: A position that represents the extreme right corner after the exit from the T Ramp.
- Bench: A little ledge in the corner, behind which a player of the attacking team can hide during the offensive of the defense side toward the middle of the map.
Recommend to read:
- Nuke callouts – name and location of all positions on the map;
- Ancient callouts – read how players name positions on the map;
- Vertigo callouts – what names of positions on the map do gamers use;
- CS GO console commands – popular cheats and commands with examples.
B Cross and B Plant
Now, let’s switch to discussing the callouts that can be met on the way to bombsite B. Of course, the main focus will be made on the point itself, however, there are a few worthy callouts at the Banana, which are paid attention to in the competitive play.
- Banana: The general name of the space that connects the exit from the T Ramp and the road to bombsite B. It is a curved passage, which includes a few separate positions.
- Start: The entrance to the Banana. It is a space under the hinged arch.
- Logs: A small nook in the left corner of the banana, which serves as a cover from the starting grenades of the defensive players.
- Wall: This position is a small wall that is located at the turn of the banana.
- Car: It is a set of boxes and boards located at the upper part of the banana.
- Pixel: It is the extreme corner of the exit to the banana from bombsite B.
- Sand Bags: This position is located in the extreme right corner of the banana. It is a set of bags, behind which you can hide or jump on them.
- Grill: A space located along the lift to bombsite B.
- CT: This is a standard name for the position held by one of the players of the defensive team. it is the main point for the retake of bombsite B.
- Flower beds: It is a slope, on which players can climb over CT.
- B1: The very first box located at bombsite B.
- B2: The second box is located at bombsite B.
- Quad: A small cover behind a tall crate that is in the dark
- Fountain: It is a giant fountain located in the middle of bombsite B.
- Dark: This is the position that marks the extreme corner of bombsite B located behind the blue barrels.
- Pillar: The position marks the player who stands behind the pillar between the quad and the dark.
- Coffins: A set of coffins located near the fountain before the passage to the construction.
- Garden: A little space located behind the coffins. It is the turn to construction.
- Construction: A building that connects the CT Spawn and bombsite B. It is one of the points that serve as the exit to the bombsite while retaking.
- Tree: A small nook located opposite the entrance to the construction.
A Cross and A Plant
We go toward bombsite A in the same way. There are a whole bunch of interesting positions, each of which has its name.
- Apartments: It is a corridor that leads to bombsite A.
- Window: It is a little room located between the boiler and the apartments.
- Boiler: A doorway leading from the apartments to the short.
- Top Mid: A position that marks the entrance to bombsite A from the middle of the map.
- Short: The right attack direction that leads to bombsite A.
- Roof: A position that marks the roof located in the short.
- 20: An open space leading to bombsite A.
- Truck: A wagon of hay placed in the short that serves as a lift to the balcony.
- Balcony: A position that marks a small balcony on the exit from the apartments.
- Under the Balcony: A small cover is located under the balcony.
- Pit: It is located in the outermost corner of bombsite A.
- Dosia: The extreme corner serves as a place to take cover from the C4 explosion. It was named in the honor of the grenade thrown by the player Dosia in the final of PGL Major Krakow 2017 that dealt enough damage for the further offensive of the attacking players.
- Cemetery: A stone wall in the back of the pit.
- Graveyard: A small cover located parallel to bombsite A.
- A Default Plant: It is a standard spot to plant C4. The pack is usually planted near the first high crate, so you can peek at it from the short, the pit, and the apartments.
- Close Left: This is the lift that is located inside the bombsite A on the side box.
- Back Site: The far point of the bombsite is protected by a few boxes from both sides.
- Small Pit: A small corner located near the exit from the library.
- Long: The left direction of attack leading to bombsite A.
- Ninja: A corner cover located to the left of the turn to the long
CT-Spawn
We will finish the review of the callouts located near the CT-Spawn.
- CT-Spawn: A place where the defensive players spawn.
- Arch: One of the directions that serve as the entrance to the long from the CT-Spawn.
- Library: This position is a standalone room that leads from the CT-Spawn to bombsite A.
- Speedway: The path that runs from the arch to the exit to the bombsite B.
- Well: It is a well located near the CT-Spawn.
These were the main positions, which are presented on the map Inferno. The remarkable thing is that there is enough terminology on the map to serve as a lesson in the history of the discipline. For example, some callouts relate to memorable moments from the professional scene, while a part of the callouts was taken from the old versions of the game.
Nevertheless, knowing the exact positions on the map will ease team play and provide more accurate information about the enemy’s location.

Elen Stelmakh is a creative individual dedicated to advancing gaming culture through articles and visual design. As a full-time EGamersWorld author and designer for a gaming website, Elen not only creates content but also infuses it with energy and creativity.


 ESL Pro League S23 Recap: NAVI Claim Their First Trophy of 2026ESL Pro League S23 recap: NAVI claim their first trophy of 2026 after a strong playoff run. Key results, biggest surprises, and what’s next for the teams.
 New Valorant Mode Knockout: Gameplay, Mechanics, and FeaturesValorant’s Knockout mode launches March 18 with Patch 12.5, featuring respawns, dynamic walls, and fast-paced gameplay.
 New Valorant Agent Miks Details – Abilities, Role, Release DateRiot Games introduces Miks, a Croatian agent in Valorant who uses sound and music to heal allies, boost teammates, and control enemies.
 Yoru and Clove Nerfs: What to Expect in Valorant Patch 12.5Valorant Patch 12.5 launches on March 18 with major nerfs for Yoru and Clove!
")
")