Where to Find the Secret Keys in DOOM: The Dark Ages - Chapter 4

In this blog, we’re continuing our hunt for all the secrets in DOOM: The Dark Ages, this time in Chapter Four. The Sentinel Barracks aren’t just a fortified stronghold — they’re pure chaos, packed with elite demons, intense arenas, and virtually zero room to breathe. If you’ve been relying on just a couple of favorite weapons until now, it’s time to bring out the full arsenal and learn to switch on the fly if you want to survive.
There are six secret areas hidden throughout the level, along with three unique collectibles — a toy, a skin, and a lore codex entry. Some are right under your nose, while others are tucked behind breakable walls and well-hidden passages.
In this guide, we’ll walk you through every secret in this location, what to watch for, and how to make sure you don’t miss anything important.
All Chapter 2 Secrets in DOOM: The Dark Ages
I’ve prepared detailed guides to help you find every secret in Chapter Four and beyond. Most of them are geared toward players aiming for 100% completion — they reveal extra lore details and contribute to your overall progress. But there are also some truly valuable finds, and I’ll make sure to highlight those along the way.
If you’re going for full completion or just don’t want to miss anything important, this guide will come in handy. And if you haven’t finished the first chapter yet, I recommend starting with the guide Where to Find Secret Keys in DOOM: The Dark Ages – Chapter 2 — there I go over every hidden room in detail.
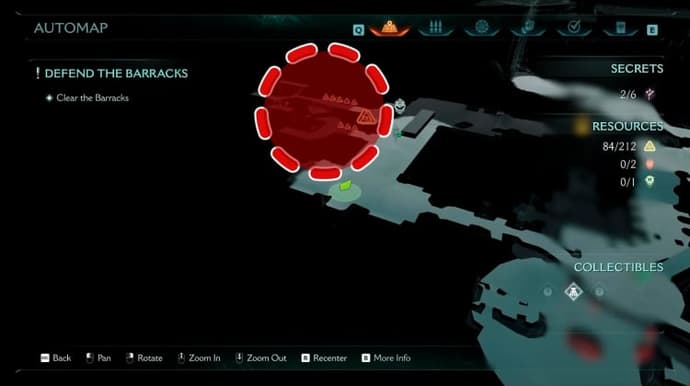
Secret Area 1: Hell Knight Toy and Some Gold
The first secret in the Sentinel Barracks is located near the corridor where you fought a group of Shield Soldiers and a massive Mancubus. After the battle, don’t rush ahead — go back to the entrance of that corridor and look to the left. On the wall, you’ll see a blue Shield Charge symbol — that’s your cue.
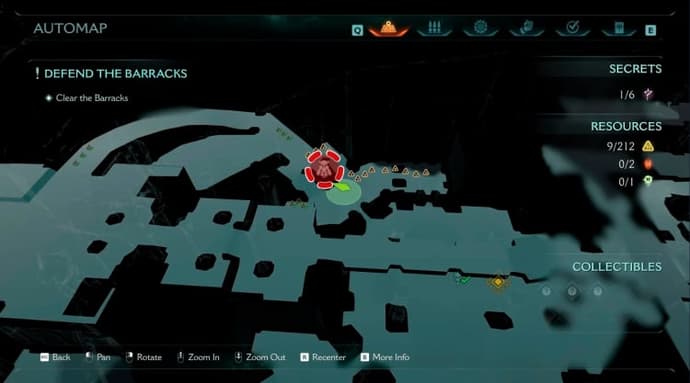
Pick up speed, activate the Shield Charge, and smash through the wall. Behind it lies a small secret room filled with resources. Inside, you’ll find ammo and 13 gold coins scattered across the floor — they’re easy to miss, so take your time and look around carefully.
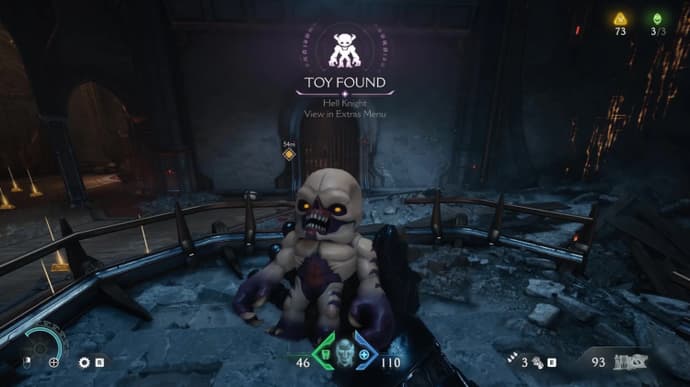
But the secret doesn’t end there. In the far corner, next to a small pile of gold, you’ll spot a thin wooden partition. You can break it as well using the Shield Charge. Do that, and you’ll reach a ledge above the stairs. Waiting for you there is the collectible Hell Knight Toy — one of three in this chapter.
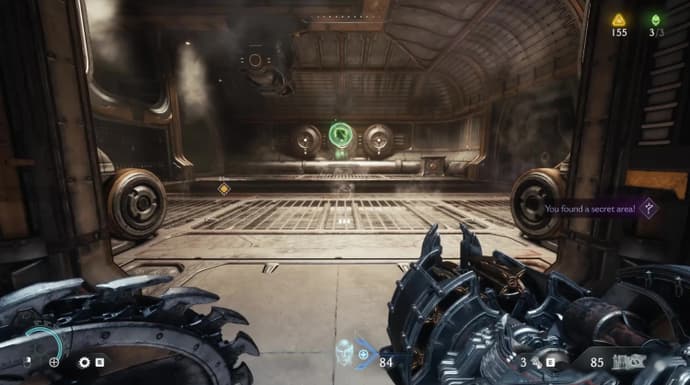
Secret Area 2: Moving Platform, Meat Node, and 53 Gold Coins
The second secret is just a few steps away from the first. After dealing with another wave of Shield Soldiers in a long corridor, you’ll enter a room with a green button on the floor. Don’t worry — it’s not a trap, but part of a small puzzle.

Look to the left — there’s a small side room you can enter. Up near the ceiling, you’ll spot a green Meat Node — a strange organic mass that reacts to shield impacts. Pick up speed, throw your shield at it, and it will activate a moving platform that lets you reach a higher level.
Jump onto the platform, walk along the narrow ledge by the wall, and carefully drop down — right in front of you will be a metal cube. Don’t destroy it — instead, charge into it with your Shield to push it toward the ledge in the adjacent room. This makeshift staircase will lead you into a hidden alcove.
And there it is — the second secret area. Inside, you’ll find a whopping 53 gold coins — a great bonus if you’re aiming to collect as much upgrade currency as possible. This time, the devs definitely went all-in on hiding the secret — it’s not something you’ll stumble upon easily. Let’s keep going.
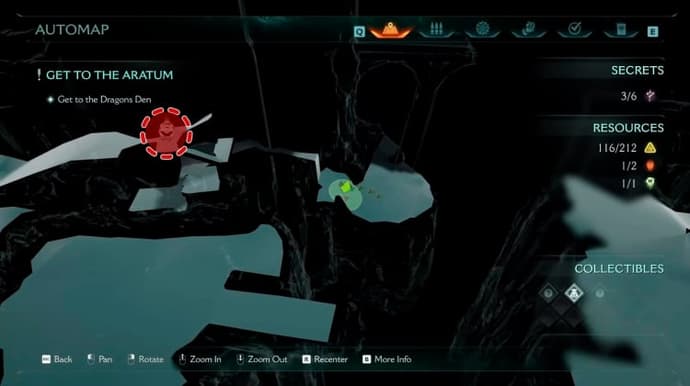
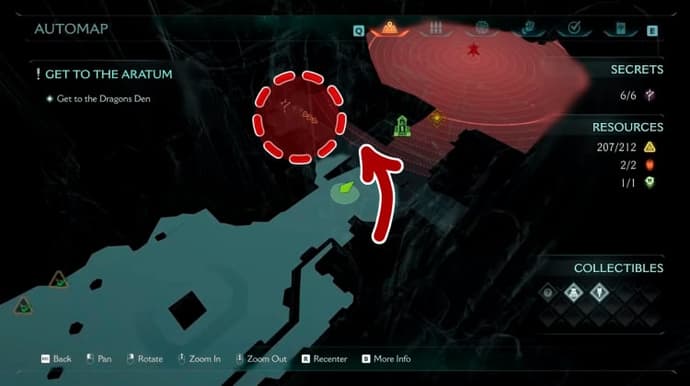
Secret Area 3: Life Sigil Before the Point of No Return
The third secret is hidden right before the chapter’s first point of no return — if you miss it, there’s no way back, so stay alert and don’t rush.
After the fight with two Hell Knights, head down the corridor toward the point of no return icon. On your way, keep an eye out — near one of the side doors, you’ll see a glowing terminal. It’s not just for show — activate it to open a hidden passage.
Behind the door, three enemies are waiting. The fight won’t last long, but the tight space leaves little room for mistakes. Once you defeat them, look at the wall directly across — it can be climbed. There are two different paths leading up, but both take you to the same place.
There you’ll find a Life Sigil — a valuable item that increases your max health — and nearby, two gold coins. Once you’ve grabbed everything, simply drop down through the hole in the floor to return to the main corridor and continue your journey.
Secret Area 4: Life Sigil Above the Arena With the Mancubus Leader
The next secret area is hidden near one of the most intense arenas in the chapter — at least in my opinion — where you’ll face off against the Mancubus Leader. He’s a massive enemy backed up by other demons, so the fight won’t be easy. Once you’ve taken them all down, don’t rush to leave the arena just yet.
Look for the wooden platform at the edge — from there, you can jump across to the opposite side. You’ll find a small stash of gold coins waiting for you, but that’s just the beginning.
Keep climbing up the ladders and ledges. At the top, you’ll reach a room with another Life Sigil — this is what marks the fourth secret area. The Sigil is in plain sight, so you won’t miss it.
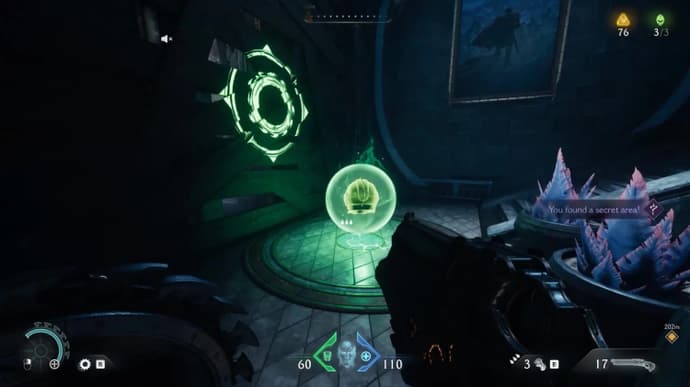
To get out of this room, you’ll need to break the wooden barrier using a Shield Charge. After that, you’ll return to the main part of the level and can continue forward.
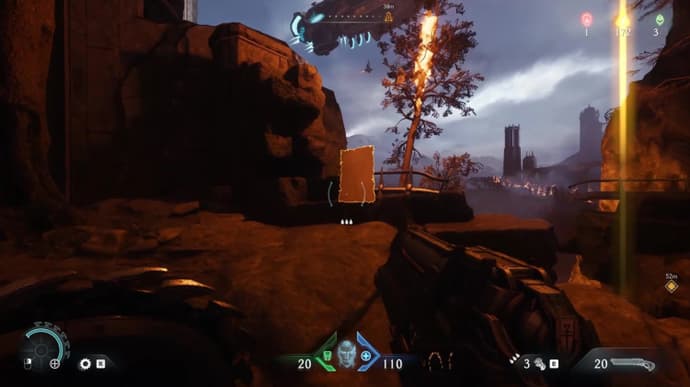
Secret Area 5: Ruby by the Statue and a Trap Beneath the Broken Bridge
The fifth secret of this chapter is located in the area where you’ll once again face demons and a Mancubus Leader — right next to the second broken bridge, near a massive burning tree. Clear the arena of enemies first, then take a moment to look around.
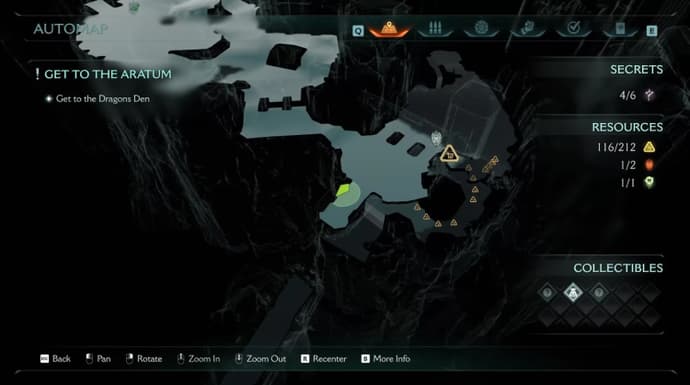
At the top of the tree, you’ll spot a Meat Node — activate it by throwing your Shield to use it as a launch pad. It will launch you straight onto the burning tree, and from there, you can reach the broken bridge’s remains.
Now pay close attention: you need to drop down onto the middle section of the bridge, then turn around and jump onto the lower platform on the other side. That’s where the path to the secret begins.
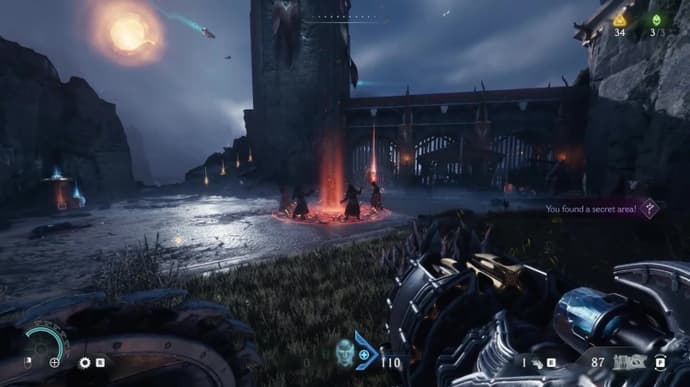
Ahead of you is a dark corridor filled with enemies and traps. Take your time — move carefully, and don’t forget to check the right side, where some gold is hidden. As you push forward, you’ll enter a chamber where several cultists are kneeling in prayer before a strange statue. Take them out — and you’ll be able to claim the Ruby lying at its base.
On your way out, look to the left — you can climb up the wall to find a bit more gold. After that, you’ll be able to return to the start of the broken bridge and continue along the main path.
Secret Area 6: Civilians, Gold, and the Nightmare Accelerator Skin
The sixth and final secret of the chapter is hidden just a few steps away from the final point of no return. When you reach the massive cliff at the very end of the level — don’t rush to jump down. Instead, take a moment to look around and explore the area — one of the most valuable collectibles in the game is hidden right here.
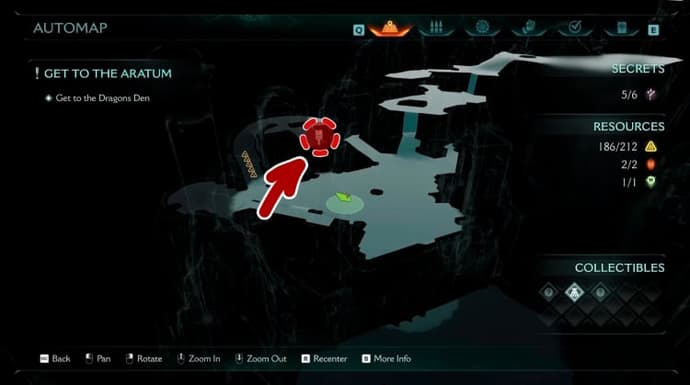
Make your way through the Sentinel Barracks until you reach a circular plaza with a large tree in the center. Surrounding it are several buildings. Your destination is the house directly across from the ruined church. Approach it and go around the right side — around the corner, you’ll find a staircase covered in gold coins. That’s where you need to go.
Climb to the top, and you’ll arrive in a quiet, almost peaceful spot where a soldier and a group of civilian NPCs are standing. They don’t react to the player, but the area serves as a striking contrast to the rest of the level’s chaos. Honestly, if they had added at least some reaction or dialogue, it would’ve done a lot for the atmosphere, in my opinion.
Turn toward the building behind them — there’s a statue, and just behind it, tucked between two spires, you’ll find the Nightmare Accelerator collectible skin. It’s one of the rarest and darkest outfits you can unlock in this chapter.
After that, you can safely return to the cliff and jump down to finish the chapter. All six secrets have been collected — but there’s still one small, final detail.
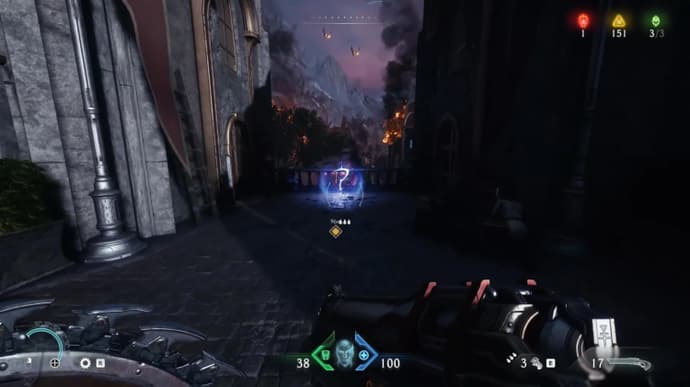
Lore Codex Entry: Sentinel Barracks — The Final Lore Page
And finally — the Sentinel Barracks lore codex page, the last collectible item in this chapter. It’s not classified as a secret area, but without it, you won’t be able to hit 100% completion — so it’s definitely worth grabbing. Plus, for lore enthusiasts and story lovers, it’s a great little bonus.
When you reach the massive gate at the end of the level, slow down and take a look around. Look up to the left — you’ll see a neat trail of gold coins leading along the wall. Follow it upward until you find yourself near the Sentinel Shrine.
To the left, there’s a broken wooden section, and just beyond it — a small bend in the path. Head that way, and you’ll find the last coins of the chapter, along with the Sentinel Barracks lore codex page right beside them. That’s it — all secrets, items, and collectibles have now been found.
If you’ve made it this far and collected absolutely everything — congratulations! The Sentinel Barracks are now 100% complete, and you’ve proven that nothing escapes your sharp eye. Now onward — to the next chapter!
How Hard Is It to Find Secrets in DOOM: The Dark Ages?
Calling them truly difficult wouldn’t be fair. But missing them in the middle of a fight? Very easy. Levels in DOOM: The Dark Ages are designed in such a way that something valuable might be hiding behind any staircase, beam, or corner. And the game doesn’t hold your hand: no markers, no pop-ups, no navigation hints — it all comes down to your curiosity and attention to detail.
Most secrets are within reach of the main path. Sometimes it’s a breakable wall, other times it’s a plain door that’s easy to run past. But if you slow down and keep your eyes open, finding them isn’t hard at all.
It’s important to understand that the majority of secrets are collectibles. Toys, skins, lore pages, gold — they don’t give you any combat advantage and are mainly there for 100% completion. If your goal is just to finish the game, you can skip them without worry.
That said, there are exceptions: some hidden spots offer real gameplay benefits. For example, Life Sigils boost your max health, and certain rooms contain large caches of resources. These are absolutely worth picking up — they make tough fights a lot more manageable.
So, you’ve got two options:
- Collect everything if you're aiming for full completion and all the achievements.
- Or go selectively, grabbing only what you need for a smooth and efficient playthrough.
Either way, guides like this one are here to help — so you don’t miss anything important or waste time wandering aimlessly.

Kirill is a writer of articles and blogs at eGamersWorld, having joined the team in 2024. His primary focus is analytics and crafting content about esports. With years of experience in gaming, Kirill brings deep industry insights to deliver high-quality and engaging materials.


 Marathon Roadmap: What Awaits Players in Seasons 1 and 2Marathon’s first two seasons are detailed by Bungie. Discover how the seasonal system works, what DEATH IS THE FIRST STEP and NIGHTFALL add, and what players can expect after launch.
 Dota 2 PGL Wallachia Season 7 OverviewEverything about PGL Wallachia Season 7: schedule, teams, format, and $1M prize pool.
 Genshin Impact Version 6.5: Leaked Banners, Endgame Resets and New ZonesGet ready for Genshin Impact Version 6.5. Explore upcoming banners featuring new Geo support Linnea, updated endgame challenges, and the highly anticipated Dornman Port map expansion.
 Arachne: Rewards & Quests of Marathon FactionExplore Arachne in Marathon: contracts, upgrades, rewards, and tactical tips for dominating PvP. A complete guide to the faction built around combat progression.
)")
)")