Titan Quest 2 Guide: How to Build a Powerful Battlemage

Titan Quest 2 features a dual Mastery system that allows players to create unique class combinations for the campaign. While nearly every gameplay element can be changed or adjusted during progression, the choice of Masteries is the only permanent decision. This guide focuses on building the Battlemage class — a combination of Warfare and Earth masteries.
Battlemage Build Gameplay
The Battlemage combines the fire-based abilities of the Earth mastery with the melee combat skills of Warfare, forming a hybrid class that performs well at both range and in close-quarters combat. This class supports the use of both Ornate Armor — heavy gear focused on physical defense — and Magos Armor, magical equipment that synergizes with the Barrier skill. This combination makes the Battlemage a viable option for a wide range of players, including those who prefer a more relaxed, straightforward playstyle.
For players coming from more demanding Action RPGs, there’s no need to worry — the only permanent choice in Titan Quest 2 is your Mastery selection. Everything else can be adjusted throughout the game, making it completely safe to follow a specific build path during the early stages of progression.
Core Strategy: Whirlwind with Fire Support
To make this build work effectively, your first focus should be on progressing through the Warfare mastery to unlock Whirlwind as early as possible. The Earth mastery plays a supportive role — it converts physical damage into Fire Damage and provides several passives that help maintain a steady Energy supply during combat.
Instead of consuming large amounts of Energy in the traditional sense, as most channeled abilities do, this build uses an Energy Reservation system — a portion of your Energy bar becomes blocked off and unavailable. This mechanic allows you to increase your total Energy pool, improve regeneration, and avoid excessive drain while using Whirlwind.
Important: to ensure consistent performance while leveling, you must equip gear that boosts Maximum Energy and Energy Regeneration. Without these stats, the build will not function reliably. For a better understanding of character progression and leveling, we recommend checking out the Titan Quest 2 Leveling System and Progression System. This blog covers all the core mechanics in detail, making it a valuable resource not only for this build but also if you plan to create your own builds or experiment in the future.
Stat Priority and Gear
Each time you level up, you receive two attribute points to allocate between your core stats. When assigning these points, consider both gear requirements and the type of damage your build is focused on. For this setup, the stat priority is as follows:
- Might – the primary stat. Increases melee physical damage and allows the use of heavy weapons and armor. It’s essential for close-range offense and survivability through stronger defenses.
- Knowledge – secondary priority. Increases your maximum Energy, improves Energy regeneration, and boosts the magical effects of abilities. It's especially important for maintaining skills that consume Energy continuously, such as Whirlwind.
- Vigor – use any remaining points here to boost overall survivability. This stat increases your Health pool and resistance to damage.
Balanced distribution across these attributes also enhances Resolve — a key stat that scales Fire Damage and amplifies the effects of elemental-based skills. Maximizing Resolve is what unlocks the full potential of the fire-based aspect of this build.
Armor
This build focuses primarily on the Might attribute, which allows you to equip heavy armor (including Ornate Armor) and wield powerful melee weapons. However, Knowledge should not be overlooked — it grants access to Magos gear, which enhances Barrier while maintaining a high armor rating. Combining both armor types results in a highly durable character, which is essential for surviving in close combat.
- Armor Rating: determined almost entirely by your equipment, as mentioned earlier.
- Barrier: its strength is also affected by gear, but the skill’s effectiveness further scales with investment into the Barrier ability found in the Core section of the Earth mastery.
- Health Regeneration: improved through several passives in the Warfare tree and directly tied to the number of Rage stacks — the more stacks you have, the faster your regeneration.
Altogether, this setup enables you to fully regenerate your Health bar when activating Barrier, keeping your character alive in nearly any situation. The only real threat comes from one-shot abilities — if you see an enemy telegraphing a powerful attack, it’s best to move out of range. While armor and resistances will protect you most of the time, avoiding such attacks is the safest option.
Weapons

Choose heavy melee weapons. Suitable options include:
- One-handed: swords, maces
- Two-handed: battleaxes, heavy hammers, and maces
If you’re unsure whether a weapon fits the build, check its Resolve requirement — the higher it is, the better it aligns with this setup.
Preferred weapon stats:
- Increased Attack Speed
- Higher Critical Hit Chance
- Added Fire Damage
Note that this build is not designed around applying ailments, so it’s best to avoid weapons focused on those effects.
Battlemage – Skills and Passives
Below is a list of active skills and passives that should be included in the build. Prioritize unlocking the key skills and modifiers from the table — they are critical for the build to function properly. Start by investing 6 Divinity points into the Earth tree, then allocate 6 Divinity into Warfare. Try to reach 18 Divinity in Warfare as early as possible — this will provide the greatest benefit.
| Skill/ Passive | Mastery | Total Points | Feats and Modifiers |
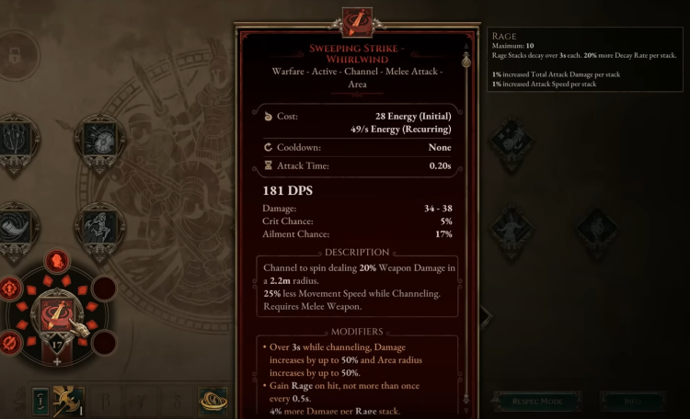
| Sweeping Strike (Active) | Warfare | 17 | Whirlwind 1/1, Rage Gain 5/5, Sunder 3/3, Ramp Up 1/5 |
| Weapon Proficiency (Passive) | Warfare | 12 | Critical Chance, Attack Speed |
| Arcane Abundance (Passive) | Earth | 8 | Energy, Regeneration |
| Earth Enchantment (Active) | Earth | 17 | Fire Imbuement 2/2, Stone Skin 5/5, Conservation 3/5 |
| Combat Rush (Passive) | Warfare | 8 | Regeneration, Damage |
| Battle Rage (Passive) | Warfare | 8 | Rage Overflow, Rage Amount |
| Earth Attunement (Passive) | Earth | 8 | Area, Weapon |
| Barrier (Core, Active) | Earth | 7 | Enduring Barrier 3/3, Ailment Cleanse 1/1, Invigorating Guard 3/3 |
| Battlefield Awareness (Active) | Warfare | 17 | Inspiration 5/5, Enhanced Regeneration 5/5 |
| Second Wind (Passive) | Warfare | 8 | Rage, Health Regeneration |
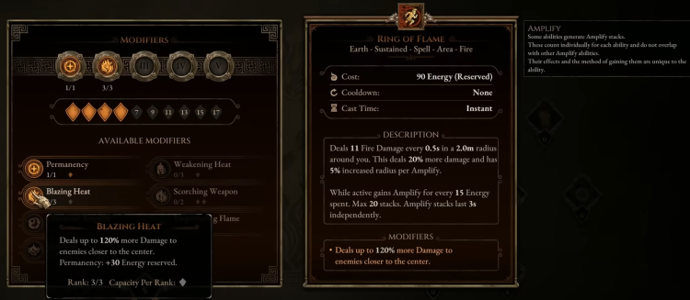
| Ring of Flame (Active) | Earth | 15 | Permanency 1/1, Weakening Heat 3/3, Enhanced Amplify 5/5 |
Mechanics and Rotation: Whirlwind, Auras, and Fire
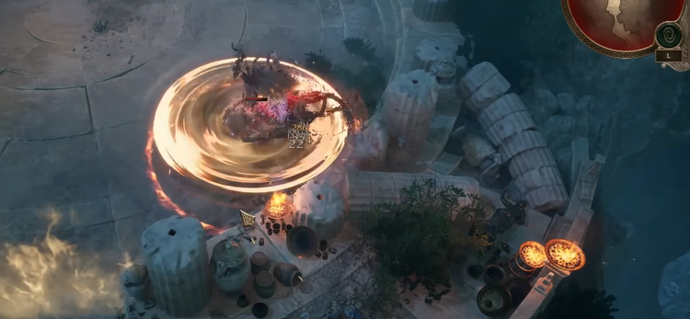
While this build follows the classic "spin to win" concept, its core relies heavily on proper aura management. The primary attack is Sweeping Strike, which is converted into Whirlwind — a channeled ability that continuously consumes Energy while held.
To boost Whirlwind’s damage, all physical weapon damage is converted into Fire Damage through Earth Enchantment. This buff also gives your weapon a fiery visual effect while active.
The secondary aura, Battlefield Awareness, provides steady Energy regeneration, allowing you to maintain Whirlwind without interruption. Combined with the Arcane Abundance passive from the Earth tree and Energy-related affixes on your gear, your regeneration should reach around 50 Energy per second by level 30 — enough to fully sustain Whirlwind.
The third key aura is Ring of Flame. With the Permanency upgrade, it becomes a toggle skill and reduces enemy Fire Resistance and Armor in its area of effect. The radius of Ring of Flame scales with Amplify stacks, which are generated by spending Energy. Since Whirlwind constantly consumes Energy, the ring’s radius will quickly grow larger than Whirlwind’s own, ensuring all nearby enemies are affected by the debuff.
Leveling Tips
Energy management is one of the key aspects of this build. Regularly adjust your skill nodes to avoid situations where you completely run out of Energy during combat — this is something you must absolutely prevent.
Keep in mind that it’s possible to reserve too much Energy. If that happens, look for nodes that reduce Energy Reservation instead of increasing it, even if that means sacrificing a bit of damage. This approach will help keep your resource usage stable.
The Barrier skill plays an important role in survivability. Try to activate it at the start of any serious encounter — it provides additional protection and greatly increases your ability to stay alive in fights.
Additionally, regardless of your chosen build or class, the following tips are worth keeping in mind:
Check merchants regularly — their inventory refreshes every time you level up, and you may find useful gear.
Increase the level range of zones whenever you can handle it — this improves experience gain and item drop quality.
Make use of DPS estimates in item tooltips — upgrades aren’t always obvious at a glance, and the stat comparison helps you make better decisions.
Monitor your resistances. While it's not necessary to reach the 60% cap during leveling, it’s a good idea to keep them balanced across the board.
If you're interested in trying a ranged-focused playstyle with strong elemental damage, take a look at the Titan Quest 2: Infinity Ice Shards Build Guide — it's a solid alternative built around sustained spellcasting and AoE control.
Following these simple but important guidelines will make your leveling experience more stable and efficient. Even when using a predefined build, you can always adapt to current conditions, avoid common mistakes, and stay effective throughout your playthrough.

Kirill is a writer of articles and blogs at eGamersWorld, having joined the team in 2024. His primary focus is analytics and crafting content about esports. With years of experience in gaming, Kirill brings deep industry insights to deliver high-quality and engaging materials.


 Crimson Desert Dimensional Labyrinth Abyss Puzzle — Full Path and SolutionCrimson Desert's Dimensional Labyrinth Abyss puzzle requires Force Palm, Axiom cores, and four silver circles to solve.
 How to Enter Lioncrest Manor — Strongbox Puzzle Solution for Crimson DesertCrimson Desert's Lioncrest Manor requires a second-floor window climb — here's how to get inside.
 Everything we know about Samson: A Tyndalston StoryEverything we know about Samson: A Tyndalston Story — release date, gameplay, story, and features of Liquid Swords’ intense action game set in a harsh, unforgiving city.
 How to Solve All Sanctum Puzzles in Crimson DesertDiscover How to Solve All Sanctum Puzzles in Crimson Desert — Full Guide to Sanctums, Core Mechanics, and Rewards.
)") Fokus
Fokus