Crimson Desert Hidden Treasure Map — All 12 Pieces Locations and Solutions

Crimson Desert scatters twelve treasure maps across Pywel, each one a hand-drawn sketch pointing toward hidden armor, weapons, and gear buried in caves, ruins, and sealed chambers. Every Crimson Desert treasure map works the same way: the drawing gives a rough visual hint, the treasure sits far from where the clue was found, and the game never confirms arrival at the correct spot. Here, you can find all 12 Crimson Desert treasure map locations.
How To Start: Where To Get The First Clue For Crimson Desert Hidden Treasure Maps
The earliest treasure map most players encounter is Piece 7, located at the model castle east of Hernand, but the first in numbered order is Piece 1 at Bellanor Beacon south of Drakesfall Gorge. Maps can be collected in any order and none are missable — they sit on tables, inside sarcophagi, at shrines, and in ruined buildings across every region of the world, waiting to be noticed without any quest marker or prompt guiding the player toward them.
The recurring patterns across all twelve solutions are consistent enough to serve as general advice: check waterfalls for caves behind them, use Force Palm on any wall, floor, or rock formation that looks unusual, inspect crypts and shrines thoroughly, and never assume the treasure is anywhere near where the map was picked up.
Treasure Map Piece 1 — Location & Solution
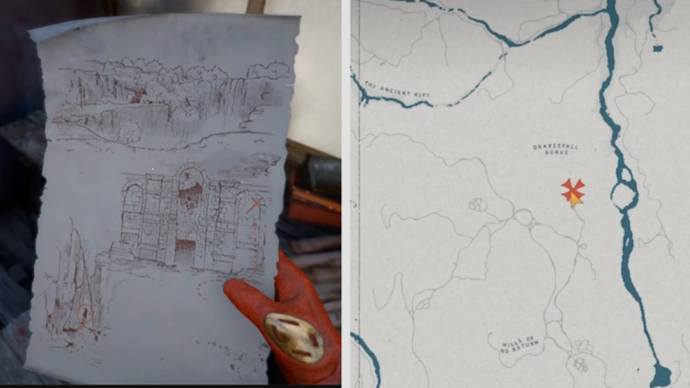
Hidden Treasure Map Piece 1 is inside the tent at Bellanor Beacon, a campsite located south of Drakesfall Gorge. Enter the tent beside the cooking cauldron and pick up the paper from the table — the sketch shows a waterfall concealing a cave entrance, with a faded green leaf symbol marking a specific wall.
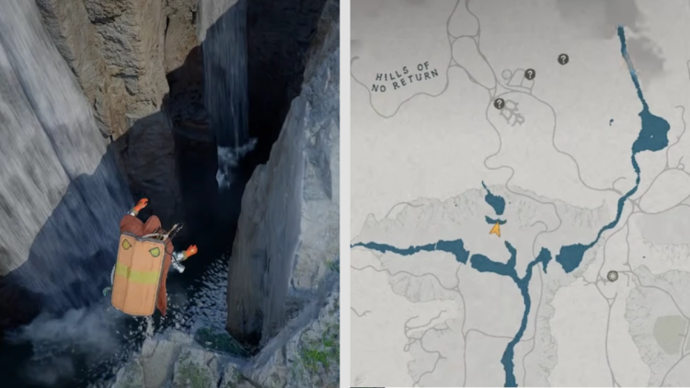
Image: Crimson Desert Treasure Map Piece 1 Solution (by ConsolePulse)
Travel to the Hills of No Return and find the intersection of two rivers where a cave faces two waterfalls. Head south from Arboria Castle and glide down into the gap between the waterfall and the cliff to locate the cave entrance. Inside, swim through the water past an archway and prepare for a boss fight against the Grave Walker — fill its yellow stun meter through repeated strikes or Force Palm, then attack its scattered pieces when it collapses. After the fight, continue deeper to the dead end, hold up the lantern, and look at the upper-right corner of the wall for a faded green leaf. Climb the wall, use Resist to grip with the dagger, and hit the marked section with Force Palm to rotate it open, revealing a hidden chamber. The chest contains the Scorchflame Plate Cloak with Fire Resistance level 3, along with a Refined Palmar Pill — a rare consumable that restores full HP after death in battle.
Treasure Map Piece 2 — Location & Solution
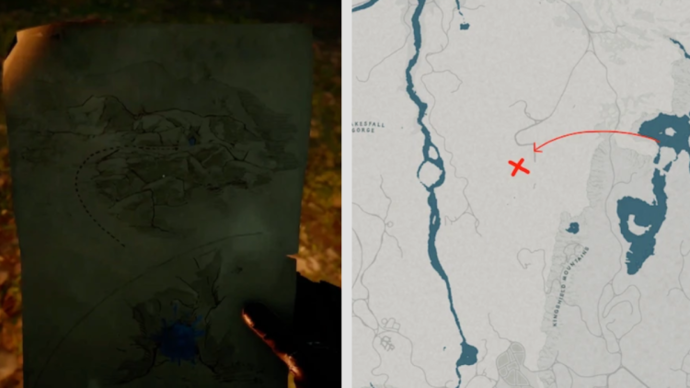
Image: Crimson Desert Treasure Map Piece 2 Location (by ConsolePulse)
Hidden Treasure Map Piece 2 is in the Kingshield Mountains, just west of The Gate of Truth ruins. Climb over the rocks until reaching a stone sarcophagus with a skeleton lying inside — the map is tucked in beside the remains, easy to miss if the area is passed through quickly.
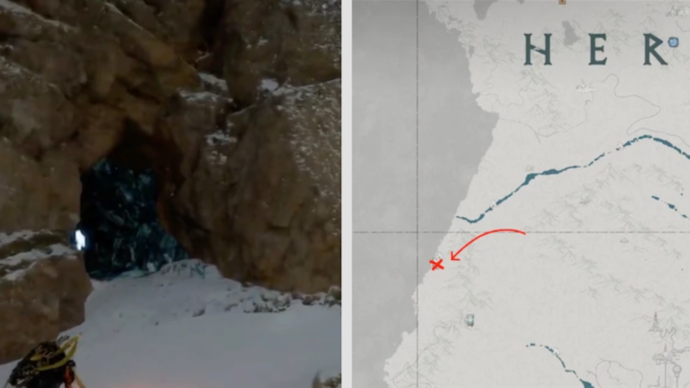
Image: Crimson Desert Treasure Map Piece 2 Solution (by ConsolePulse)
The sketch points toward Everfrost, the frozen region along the far western edge of the world map. This is one of the longest distances between a map pickup and its corresponding treasure location, spanning almost the full width of Pywel. Enter Everfrost Cave and search the interior thoroughly, checking every alcove and corner. The game gives no prompt or confirmation when the correct cave is reached, so finding the chest requires patience and trust in the location. The reward inside is the Plate Gloves of Shadows, a piece of shadow-themed plate armor that covers the hand slot.
Treasure Map Piece 3 — Location & Solution
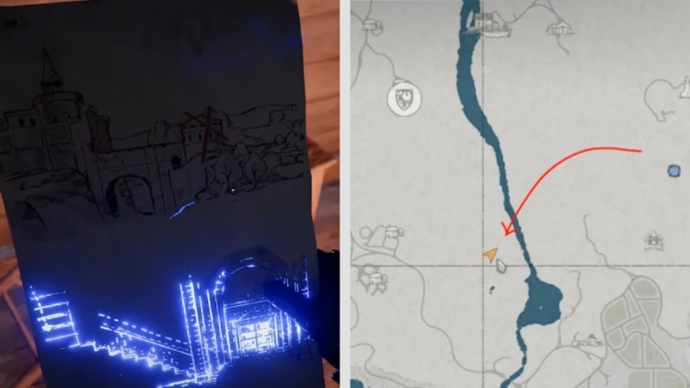
Image: Crimson Desert Treasure Map Piece 3 Location (by ConsolePulse)
Hidden Treasure Map Piece 3 is at the Hills of No Return, inside a black smoking cabin surrounded by dead soldiers outside and within. The map sits on top of a wooden drawer chest inside the burning house — a grim scene that serves as the only landmark for the clue.
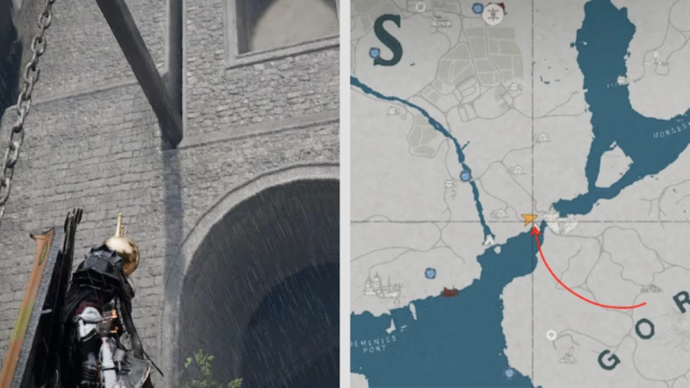
Image: Crimson Desert Treasure Map Piece 3 Solution (by ConsolePulse)
The treasure is hidden at the Gate of Peace in Gorthak. Enter through the main gate and follow the flight of stairs all the way down until reaching a room with a bookshelf standing against the far wall. Push the bookshelf to reveal a hidden passage and a chest behind it — the bookshelf gives no visual hint that it can be moved, so this step depends on checking every piece of furniture in the room. The reward is the Liberre Rapier, a weapon rather than armor — one of the few treasure map rewards that falls outside the gear-slot pattern established by the other eleven maps.
Treasure Map Piece 4 — Location & Solution
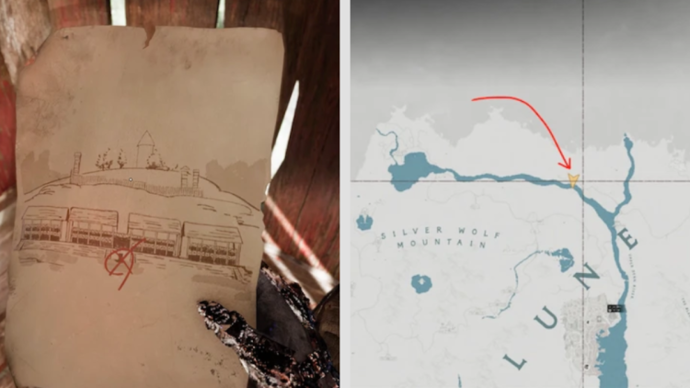
Image: Crimson Desert Treasure Map Piece 4 Location (by ConsolePulse)
Hidden Treasure Map Piece 4 is in The Argent Peaks at the destroyed wooden cabin near Abandoned Dock. The map is lying on the floor inside the ruined structure, partially hidden by debris from the collapsed walls. The sketch on the paper shows what appears to be a tower in the background, pointing toward a trading post rather than a natural landmark.
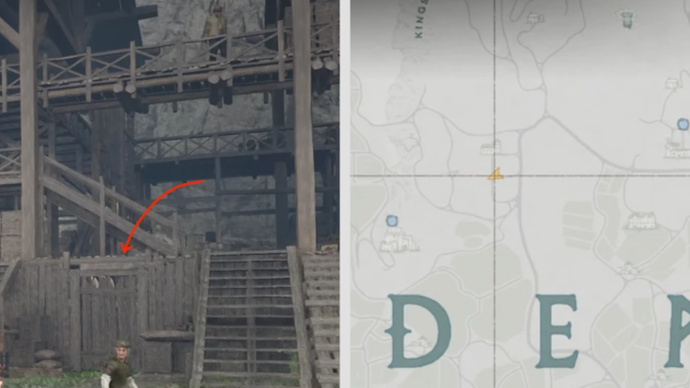
Image: Crimson Desert Treasure Map Piece 4 Solution (by ConsolePulse)
The treasure is at the Golden Trading Post. On arrival, look for the wooden door positioned between two staircases — this entrance blends into the surrounding architecture and is easy to walk past. Go through the door, open the chest, and collect the Scorchflame Plate Armor, a companion piece to the Scorchflame Plate Cloak found in Map 1.
Treasure Map Piece 5 — Location & Solution

Image: Crimson Desert Treasure Map Piece 5 (by ConsolePulse)
Hidden Treasure Map Piece 5 requires reaching Trust Level 100 with a wandering sellsword in the town of Hernand. Once the trust threshold is met, open the Cylindrical Wooden Box the sellsword provides to obtain the map — this is the only treasure map in the game that cannot be picked up from the environment and instead depends on an NPC relationship.
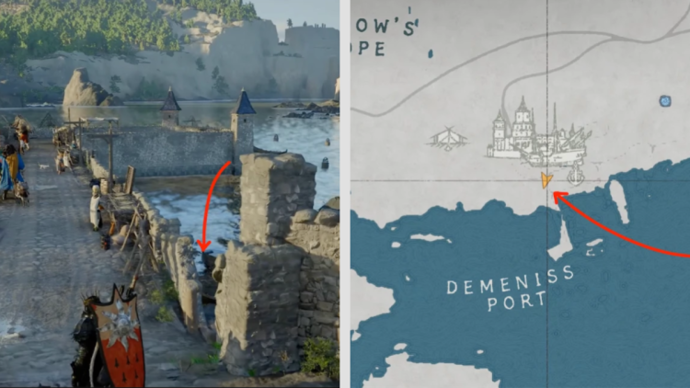
Image: Crimson Desert Treasure Map Piece 5 Solution (by ConsolePulse)
The treasure is in Demeniss Port. Search the area for a small hidden wooden door matching the sketch on the map clue — it is tucked into the scenery and looks like part of the environment rather than an interactive object. Break it open and enter the space behind it. The chest inside contains the Wanderer of Faiths Plate Helm, a named helmet that pairs with the Wanderer of Faith Leather Armor from Map 6. Players who solve both Maps 5 and 6 can equip both Wanderer pieces simultaneously.
Treasure Map Piece 6 — Location & Solution
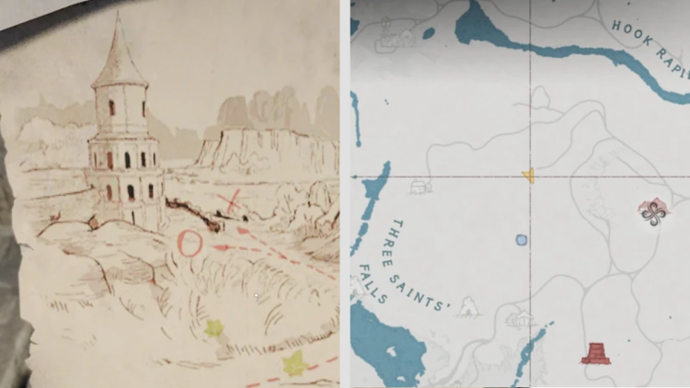
Image: Crimson Desert Treasure Map Piece 6 Location (by ConsolePulse)
Hidden Treasure Map Piece 6 is at Karin Quarry and can only be reached after defeating the boss Marnie's Excavatron. Once the Excavatron falls, look to the right from where it entered the arena — an entrance covered by wooden panels is tucked into the wall. Break through the barrier, head inside, and open the chest to collect the map.
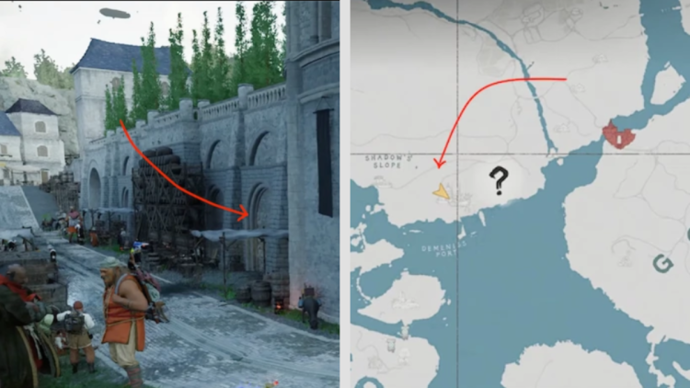
Image: Crimson Desert Treasure Map Piece 6 Solution (by ConsolePulse)
The treasure is at the Silvermoon Trade House in Demeniss Port, the same port district that houses Map 5's reward. Find the tall building and check the wall beside it for a secret panel that does not visually stand out from the surrounding stone. Use Force Palm on the hidden wall to push it open and reveal a concealed room with a chest. Inside is the Wanderer of Faith Leather Armor, completing the named Wanderer set alongside the helm from Map 5.
Treasure Map Piece 7 — Location & Solution
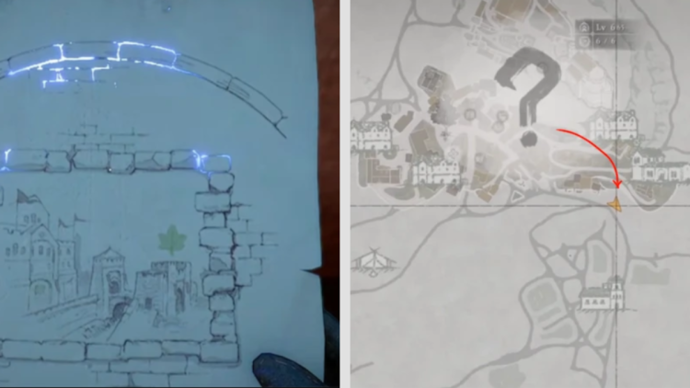
Image: Crimson Desert Treasure Map Piece 7 Location (by ConsolePulse)
Hidden Treasure Map Piece 7 is near Hernand Farmhouse at a small castle-like structure on the east side of town, sitting on a stool inside the miniature building. The model castle is a distinctive visual landmark, making this one of the easier maps to stumble across during normal exploration of the Hernand area.
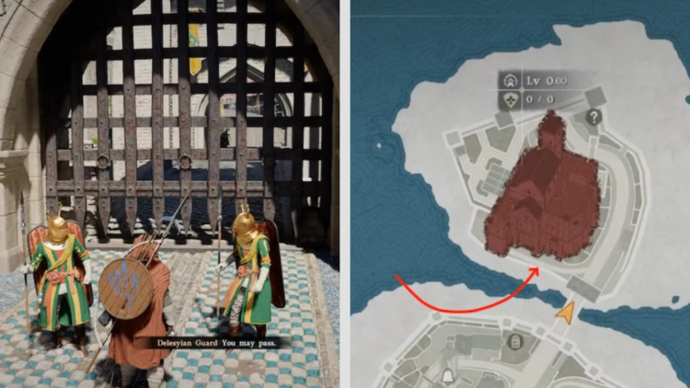
Image: Crimson Desert Treasure Map Piece 7 Solution (by ConsolePulse)
The treasure is at Delesyia Castle in the far eastern region of Pywel — the opposite end of the continent from where the clue is found. I think Piece 7 is the most punishing map in the entire set, because nothing about the sketch signals that distance, and the castle requires the Visione Helmet from early Chapter 2 to enter. Once through the gate, cross the bridge into the castle grounds and turn left. Walk forward a short distance, then inspect the wall on the right for a brick frame matching the map sketch, with small torch holders on either side. Hold the lantern up to reveal a leaf symbol high on the right side. Climb the wall, use Resist with the dagger to grip the surface, and hit the marked section with Force Palm — the wall rotates, opening a hidden chamber. Inside is the Frozen Heart Plate Armor, a high-defense chest piece that functions as an upgrade over most gear available at that stage. Exit the same way by holding the wall with Resist and using Force Palm to rotate back through.
Treasure Map Piece 8 — Location & Solution
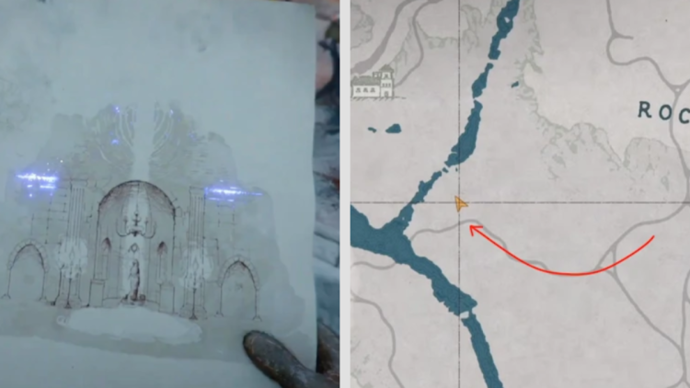
Image: Crimson Desert Treasure Map Piece 8 Location (by ConsolePulse)
Hidden Treasure Map Piece 8 is at Rocca's Hill inside a broken-down building sitting just off the main road, southwest of Rocca's Hill proper. The map rests at a shrine within the ruined structure, visible once the building is entered and the interior is checked. The sketch on the paper depicts an altar, pointing toward a religious building rather than a cave or ruin.
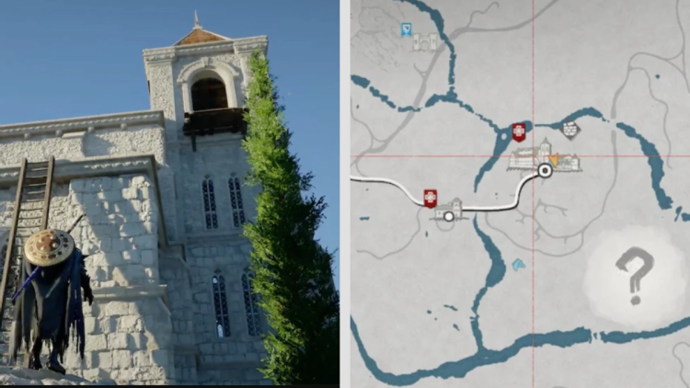
Image: Crimson Desert Treasure Map Piece 8 Solution (by ConsolePulse)
The treasure is inside St. Halssius's House of Healing, east of Rocca's Hill. Enter the building, go to the left side of the entrance, and climb the ladder to the upper room — the ladder is easy to overlook because it sits against the wall at an angle that does not immediately draw attention. Once upstairs, aim down at the floor and use Force Palm on the patterned surface — the floor flips open and drops into a hidden room below. The chest at the bottom contains the Blackwing Leather Boots, a leather armor piece for the feet slot.
Treasure Map Piece 9 — Location & Solution
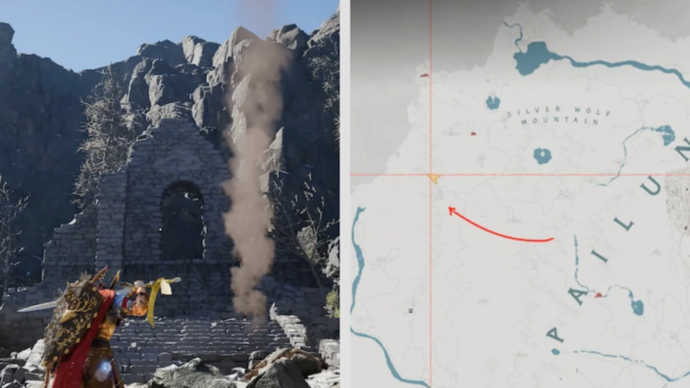
Image: Crimson Desert Treasure Map Piece 9 Location (by ConsolePulse)
Hidden Treasure Map Piece 9 is at the castle ruins on Five-Finger Mountain near the Silver Wolf Mountains in Pailune. Turn right into the crypt beneath the ruins, follow the pathway down, and look beside the skeleton lying in the first coffin to collect the map.
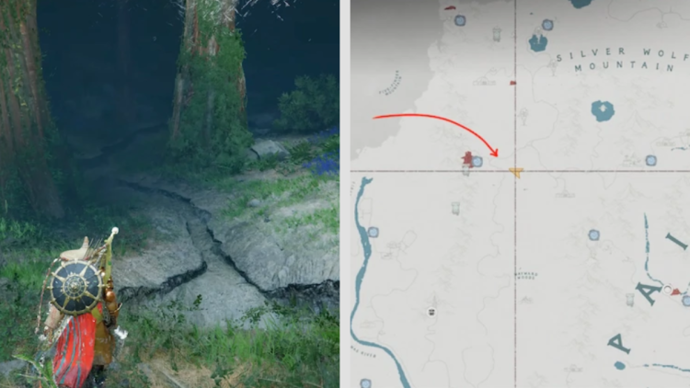
Image: Crimson Desert Treasure Map Piece 9 Solution (by ConsolePulse)
The treasure is in Wayward Woods, and the trick here departs from the usual wall-and-cave pattern used by most other maps. The chest is hidden beneath the road itself rather than behind a wall or inside a structure. Search the path for a hole or depression in the ground — it looks like natural terrain damage at first glance — and use Force Palm on it to break through the surface. The drop leads to a small underground space containing the Odeck's Protector Plate Armor, a defensive piece named after a figure referenced elsewhere in the world.
Treasure Map Piece 10 — Location & Solution
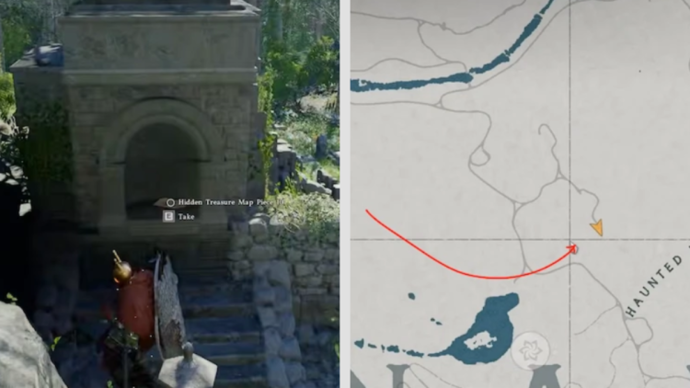
Image: Crimson Desert Treasure Map Piece 10 Location (by ConsolePulse)
Hidden Treasure Map Piece 10 is near Hunter's Cabin, on the left side of a tomb entrance tucked into the landscape near the Haunted Hills. The map sits beside the entrance and can be grabbed without entering the tomb itself.
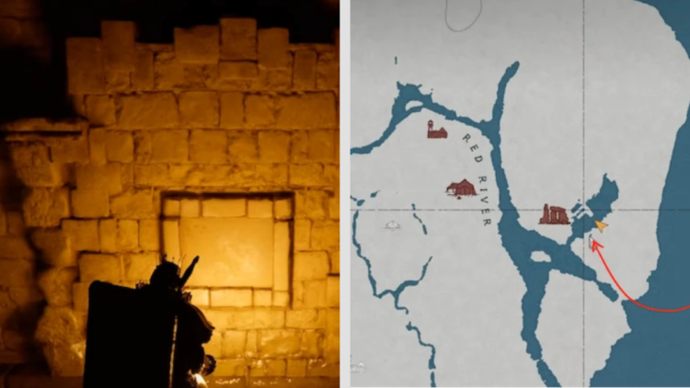
Image: Crimson Desert Treasure Map Piece 10 Solution (by ConsolePulse)
The treasure is at Bursada Castle Ruins by the Red River. Navigate through the ruins, climbing stairs and passing through doorways until reaching a hallway containing a wall puzzle — a flat panel set into the stone that matches the sketch on the map. Use Force Palm to flip the wall and open the route to the treasure room on the other side. The path through the ruins involves multiple levels and can be disorienting without the map images as reference, so follow the main corridor upward through the staircase and continue straight through the door ahead. The chest contains the Golden Greed Plate Armor, one of the heavier defensive pieces among the treasure map rewards.
Treasure Map Piece 11 — Location & Solution
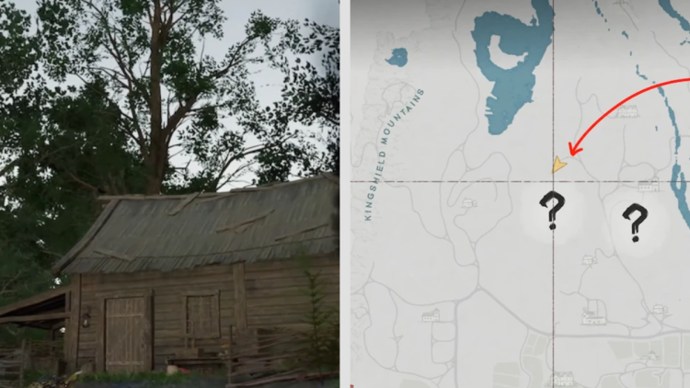
Image: Crimson Desert Treasure Map Piece 11 Location (by ConsolePulse)
Hidden Treasure Map Piece 11 is at Burnhand Quarry in the Kingshield Mountains, inside a black smoking wooden cabin — a similar landmark type to Map 3's cabin in the Hills of No Return, suggesting a pattern in how the developers placed certain clues. Enter the cabin and collect the map from the table. The sketch suggests a location near railway infrastructure, which narrows the search to Sandshift Basin.
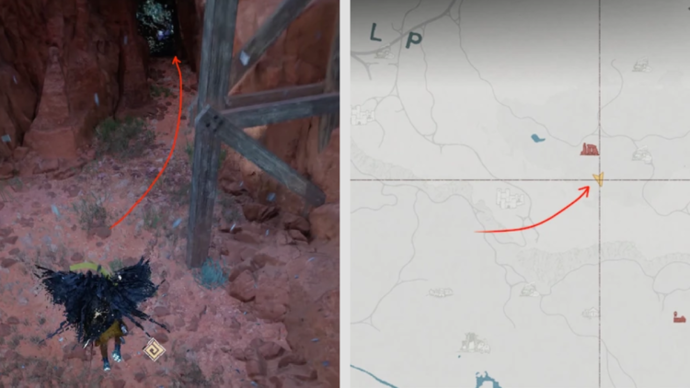
Image: Crimson Desert Treasure Map Piece 11 Solution (by ConsolePulse)
The treasure is in Sandshift Basin. Follow the railway tracks until reaching the tunnel entrance, then jump down off the side just before entering the tunnel rather than walking straight in. Below the drop, a cave entrance is blocked by a multicolored rock wall that blends into the terrain. I run through this section expecting another standard sealed room, but the reward — Oblivion of The Past — is a named item distinct from the plate-and-leather gear found in the other eleven chests, and it justifies the extra navigation required to reach it. Use Force Palm to break open the rock wall and claim it from inside the cave.
Treasure Map Piece 12 — Location & Solution
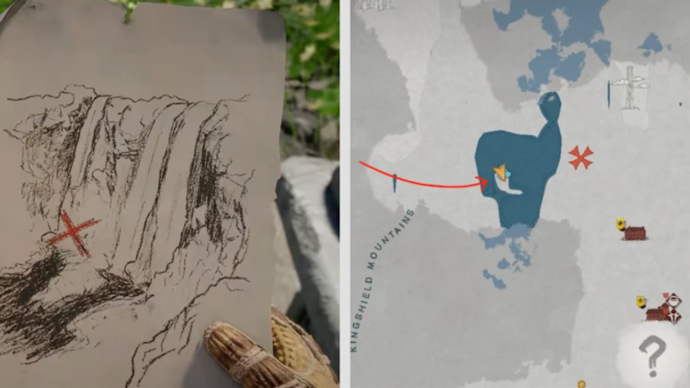
Image: Crimson Desert Treasure Map Piece 12 Location (by ConsolePulse)
Hidden Treasure Map Piece 12 is at Crescent Lake on top of a shrine north of the lake island. The map sits in plain sight on the shrine surface, making it one of the most visible pickups among the twelve maps — though recognizing it as a treasure map clue still requires approaching the shrine and interacting with the object.
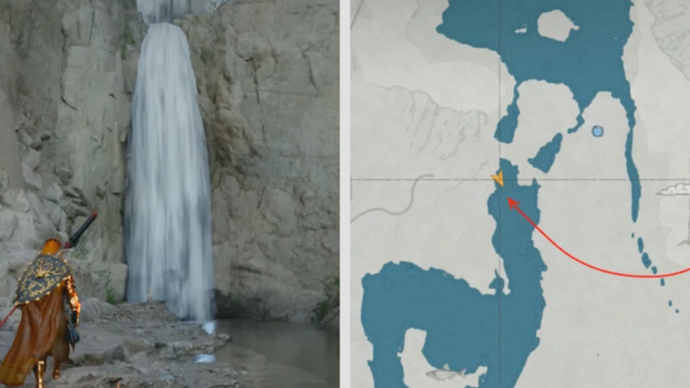
Image: Crimson Desert Treasure Map Piece 12 Solution (by ConsolePulse)
The treasure is also at Crescent Lake, making this the only map where the clue and the reward exist in the same region. That proximity should not be mistaken for simplicity — the cave entrance is still concealed behind moving water. Find the cluster of waterfalls on the lake, climb to the top of the area, and locate the smaller waterfall among them. Use the Pierce attack to cut through the sheet of falling water and enter Crescent Cave hidden behind it. The chest inside holds the Autumn Banquet Leather Boots, the final confirmed treasure map reward in the current version of the game. With all twelve maps solved, the full set of treasure map rewards covers chest armor, gauntlets, helmets, boots, a cloak, a rapier, and a unique named item — enough variety to serve nearly every build type available in Crimson Desert.
Crimson Desert Guides & Tips
Combat in Crimson Desert rewards studying enemy timing before committing to attacks. All Shields absorb heavy damage in multi-enemy encounters, particularly in faction-controlled zones where ambush difficulty scales with story progression. Getting shield durability past +5 through Equipment Refinement costs Abyss Artifacts, same as every other high-end upgrade.
Patch 1.01.00 shipped on March 28, 2026, adding five new mounts: Silver Fang, White Bear, Snowwhite Deer, Rock Tusk Warthog, and Icicle Edge Alpine Ibex. Defeat the creature, skin it for materials, then craft a Sigil at a Witch's Altar to register the mount on the radial wheel permanently.
Legendary weapons (here Unique weapons) in Crimson Desert are rare, lore-tied armaments with fixed, powerful Abyss Gear modifiers that set them apart from standard gear — hidden behind boss kills, locked rooms, and secret caves across the world of Pywel.
Abyss Artifacts replace experience-based leveling in Crimson Desert. Every skill unlock, stat boost, and equipment push past +5 depends on collecting them through enemy farming or tracking down the 141 Sealed Artifacts scattered across Pywel.

Vitalii Diakiv writes gaming blogs and guides, focusing on the latest announcements and games matched with pop-cultural phenomena. Second, he covers esports events Counter-Strike 2, Marvel Rivals, League of Legends, and others.


 Crimson Desert Best Spears - Ranked List and How to Get S-Tier GearLooking for the best spears in Crimson Desert? Explore our tier list and location guide for top two-handed polearms to maximize your damage and reach in combat.
 IEM Rio 2026: Schedule, Format, and Key DetailsIEM Rio 2026 preview: dates, format, prize pool, opening matches, and top contenders. Discover favorites, dark horses, and how to watch the event.
 Crimson Desert The Best One-Handed Swords - Ranked List and How to Get S-Tier GearMaximize your damage in Crimson Desert with our guide to the top one-handed swords. We ranked the best S-Tier weapons and provided their hidden locations so you can upgrade your arsenal.
 Riot Announces Major Changes to the VCT Partnership Program Starting in 2027Riot Games opens up the Valorant Champions Tour in 2027—new format, more tournaments, and шанс for every team.
") 0 esforço fc 2Watch match
0 esforço fc 2Watch match