Best PoE 2 The Third Edict Mercenary Build - Explosive Shot

If you are new to Path of Exile 2 and previously played the first game, or even if you did not, here is a brief introduction to the Mercenary class. This class offers a combination of mobility plus damage, similar to the Ranger, but with better survivability. The Mercenary is an excellent choice if you like playing at range with high damage and do not want to worry too much about your survivability. One of the strongest options in patch 0.3.0 The Third Edict is the Explosive Shot Mercenary, which will provide comfortable act progression and will also be relevant for endgame content. So if you already see your ideal gameplay in this description, below is the full step-by-step breakdown for you.
Explosive Shot Mercenary – OP The Third Edict
In my opinion, the Mercenary Explosive Shot in Path of Exile 2 is one of the most comfortable builds in the game. While it’s not exactly the easiest to master, it’s also far from overly complicated, and it doesn’t require heavy investment to play smoothly. This build performs excellently both during act progression and in the endgame. And of course, it’s designed for total destruction of everything in your path, including bosses, who will fall after the right combo. It’s safe to say that Explosive Shot Mercenary is one of the best path of exile 2 ranger build in Patch 0.3.0 The Third Edict. Well then, let’s dive into a more detailed breakdown.
Explosive Shot Mercenary Skills
So let’s start by breaking down the early stages of the game. For this character, at the beginning of Act 1 you should use Fragmentation Rounds and a basic attack, which will provide stable damage early on. Additionally, boost your shots with Flame Wall to deal fire damage. Once level 3 skills become available, switch to High Velocity Rounds — they significantly increase damage, especially in boss fights. This skill will be your main one until you unlock Explosive Shot.
- Fragmentation Rounds – Rapid Attacks I, Double Barrel I
- High Velocity Rounds – Multishot I, Rapid Attacks I
- Flame Wall – Fortress
- Herald of Ash – Magnified Area I
During Acts 2 and 3, you’ll gain access to Explosive Shot, and that’s when the build really begins to shine and take the shape we want. Clear speed becomes incredible. It’s as simple as aiming, shooting, and watching groups of enemies explode.
- Explosive Shot – Multishot II, Elemental Armament II, Fire Penetration
- Flame Wall
- Herald of Ash – Magnified Area II
- Wind Dancer – Pin II, Blind I
By the time you reach Act 4, you’ll unlock all skills and start finding level 4 support gems. Also, keep in mind that at level 45 you can equip the Three Dragons helmet and start using Shockburst Rounds for powerful single-target damage. We’ll cover that a bit later in its own section.
P.S. Level 5 support gems — Lightning Mastery, Blind II, and Fire Penetration II — will drop later, in the Interlude Acts after Act 4.
And here are the gems that unlock one of the strongest Mercenary builds in PoE2:
Explosive Shot is a powerful clearing skill that deals explosive area damage, making it highly effective for wiping out groups of enemies.
Support gem setup:
- Multishot II - fires additional projectiles.
- Lightning Exposure - reduces enemy lightning resistance.
- Innervate - boosts lightning damage and grants a chance to Shock.
- Arjun’s Medal - adds bonus effects to attacks.
- Fire Penetration II - lowers enemy fire resistance.
When facing tough bosses, replace Innervate and Arjun’s Medal with Shock and Elemental Armament II to maximize single-target damage.
Shockburst Rounds deals massive damage but can only be activated against enemies under the Shock effect. First, you need to apply Shock with Explosive Shot, and then use Shockburst Rounds to finish off the boss. This combo fully unleashes the skill’s potential and allows you to maximize damage output.
Support gem setup:
- Concentrated Area — increases area damage.
- Elemental Armament II — adds extra elemental damage.
- Rapid Attacks II — boosts attack speed.
- Lightning Attunement — increases lightning damage effectiveness.
- Deliberations — improves damage and critical consistency.
If you find Rakiata’s Flow, use it instead of Deliberation. In that case, you’ll need to make small adjustments: remove Elemental Weakness and replace Lightning Exposure with Deliberation in the Explosive Shot setup.
Emergency Reload is a powerful buff that greatly increases your damage. The best time to use it is when switching to Shockburst Rounds, right before starting a boss attack.
Support gem setup:
- Cooldown Recovery II - reduces skill cooldowns.
- Prolonged Duration II - extends skill duration.
- Efficiency II - lowers mana costs.
Mortar Cannon - this totem should be activated at the very start of boss fights. It grants you 30 Rage, which increases your attack damage by 30%.
Support gem setup:
- Cluster Grenade - fires multiple projectiles.
- Multishot II - enhances multishot.
- Font of Rage - generates rage.
- Prolonged Duration II - extends skill duration.
- Payload - boosts explosive effect.
Herald of Thunder — a buff that, thanks to the Coming Calamity passive, increases lightning damage by 40%. In addition, it freezes and blinds nearby enemies, making it effective not only for dealing damage but also for controlling opponents.
Support gem setup:
- Blind II - blinds enemies, lowering their chance to hit.
- Lightning Penetration - reduces enemy lightning resistance.
- Freeze - applies freeze.
- Elemental Armament II - increases elemental damage.
Herald of Ash - increases fire damage and ignites enemies with excess damage. Thanks to the passive Coming Calamity, it grants +40% fire damage and makes map clearing much faster.
Support gem setup:
- Magnified Area II - increases area of effect.
- Precision I - improves attack accuracy.
- Cannibalism I - boosts damage at the cost of health.
Wind Dancer - this skill significantly increases evasion, allowing the character to stay in fights longer and avoid more incoming damage. A great choice for improving overall survivability.
Support gem setup:
- Pin II - restricts enemy movement.
- Blind II - reduces enemy chance to hit.
- Maim - slows enemies and lowers their effectiveness.
- Knockback - pushes enemies back, keeping them at a safe distance.
Elemental Weakness - a curse that should be used against bosses before Shockburst Rounds to deal significantly more damage.
Support gem setup:
- Heightened Curse - strengthens the effect of the curse.
- Efficiency II - reduces mana costs.
- Lightning Mastery - increases lightning damage.
- Prolonged Duration II - extends the duration of the curse.
- Focused Curse - makes the curse more powerful in a smaller area.
Voltaic Mark - a skill that increases the chance to inflict shock and makes its effect stronger. Apply it to bosses before using Shock via Explosive Shot to maximize damage.
Support gem setup:
- Efficiency II - reduces mana costs.
- Prolonged Duration II - extends the duration.
- Mark for Death - applies an additional debuff to increase damage.
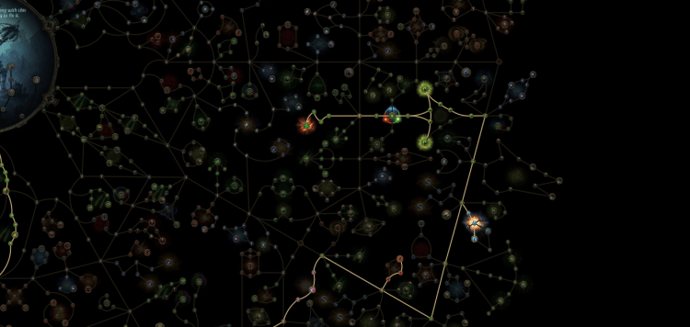
Explosive Shot Mercenary Passives Tree
For the Explosive Shot Mercenary to reach its full potential, it is important to allocate passive points correctly. We will examine each stage in detail with explanations and screenshots to make sure nothing is missed and to turn our poe 2 Mercenary build into a maximally deadly one.

At the start of leveling Explosive Shot Mercenary, the first priority is Remorseless — it boosts projectile damage, improves stun buildup on nearby enemies, and gives a bit of Strength and Dexterity. Next, it’s worth investing in Ricochet, which grants your bolts an additional chance to ricochet, greatly speeding up clear. After that comes Overwhelm — while it slightly reduces attack speed, it compensates with a strong bonus to two-handed weapon damage and stun potential. Then we pick up Colossal Weapon, which expands the area of your attacks and adds Strength, followed by Curved Weapon, providing Dexterity and Accuracy to make hits more consistent.

The next useful node for the Explosive Shot Mercenary is Rapid Reload. It increases crossbow reload speed by 40%, which directly improves overall DPS.

Next, we move further down to pick up Reusable Ammunition. This node grants a 30% chance to not consume a bolt after reloading, which reduces downtime and helps maintain steady DPS. In the same branch, we take Full Salvo, which increases crossbow damage by 25% for each type of ammunition used in the last 10 seconds. This provides an excellent damage boost for the Explosive Shot Mercenary during longer fights.

Next, we once again increase our damage by taking Short Shot. This node reduces projectile speed by 10% but boosts their damage by 20%. For the Explosive Shot Mercenary, this trade-off is more than worth it: the loss of speed is barely noticeable, while the extra damage significantly improves the effectiveness of your shots.

Exploit increases damage by 25% against enemies affected by elemental ailments such as ignite, shock, or chill. On top of that, it extends the duration of these effects by 15%. For the Explosive Shot Mercenary, this is a perfect upgrade: the skill naturally applies status effects with ease, which means this node consistently boosts overall DPS while also improving crowd control.

Next, we move toward Catalysis. It grants +20% elemental damage with attacks and converts 5% of physical damage taken into a random element. After that, Maiming Strike fits perfectly into the setup. It increases attack damage by 25% and provides a 25% chance to inflict maim on hit. This effect slows enemies and makes them more vulnerable, while the node itself offers a steady damage boost. Together, this combination strengthens your core elemental damage while also adding useful crowd control.

Now we shift the focus toward elemental damage. We start with Coming Calamity, which grants +40% damage from each Herald — a massive boost to overall DPS. Then we take Emboldened Avatar, which strengthens shock, freeze, and ignite, making elemental debuffs far more dangerous. Forces of Nature allows us to ignore 15% of enemy resistances, an invaluable bonus in the endgame. After that comes Flash Storm, providing +30% shock chance and 15% lightning penetration. Finally, Lightning Rod adds a 30% chance to deal “lucky” lightning damage, ensuring more consistent and reliable damage output.

At this stage, we strengthen survivability through evasion nodes. Enhanced Reflexes grants +20% evasion, part of which is converted into damage deflection, and also adds +8 dexterity. Here it’s worth noting an important detail: every 5 points of dexterity increase evasion by 1%, so scaling this stat always benefits defense. Next, we take Beastial Skin, which doubles the evasion bonus gained from armor — especially effective with high-quality gear. Finally, Proficiency gives +25 dexterity, boosting not only accuracy and attack speed but also further increasing evasion.

After that, we need to backtrack a bit and pick up Backup Plan. This is a useful defensive node that adapts to the situation in combat. If the character was hit recently, it grants +90% evasion rating, helping to survive a flurry of attacks. On the other hand, if you haven’t taken damage, it provides +90% armor, boosting protection against rare but heavy hits. A versatile node that works well both against bosses and during mapping, stacking effectively with our other defensive nodes.
Falcon Technique is one of the most valuable nodes for the Explosive Shot Mercenary. It increases attack speed by 1% for every 25 Dexterity. Since this build heavily stacks Dexterity, the bonus quickly becomes very noticeable: the higher your Dexterity, the faster your character attacks and the more damage you can deal in a short time.
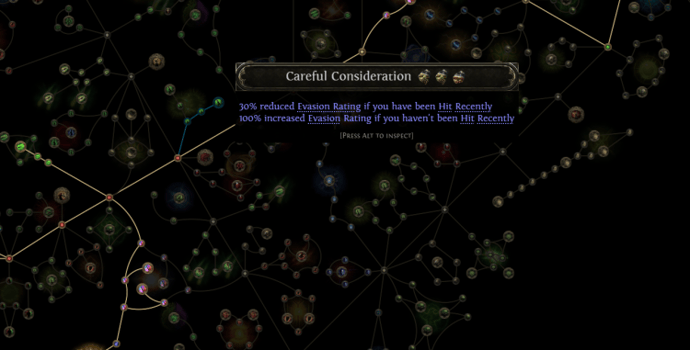
And finally, we need to take Careful Consideration. This node increases evasion if you haven’t taken damage recently (+100% to evasion rating). But when you are hit, it is reduced by 30%. An excellent choice for playing at range.
Explosive Shot Mercenary Ascendancy
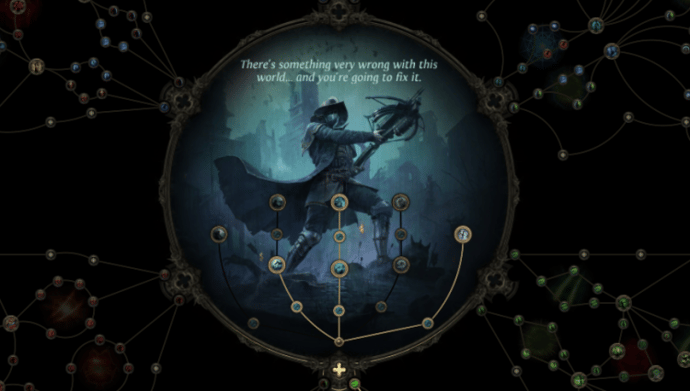
Now let's go over the Ascendancies and the order in which it's best to take them.
We start by taking Zealous Inquisition. This node grants a chance for slain enemies to explode, dealing damage based on their maximum health. It’s especially effective against undead and demons, where the chance is doubled. This greatly speeds up clearing and adds a sense of raw power to the build.
Next, we move toward Witchbane. This node is tied to the Concentration mechanic: it limits its maximum, but allows us to completely break through it with a hit. Essentially, it’s a tool to strip enemy defenses and unleash damage more quickly.
After that, we take No Mercy. The mechanic here is simple — the lower the enemy’s Concentration, the more damage they take, up to +40%. Combined with Witchbane, this works perfectly: first we break their defenses, then we finish them off with maximum efficiency.
Finally, we pick Pitiless Killer. This grants Culling Strike, causing enemies with low health to die instantly. It’s extremely useful both in boss fights and during map clearing, ensuring that even the tankiest targets fall faster.
Explosive Shot Mercenary Items
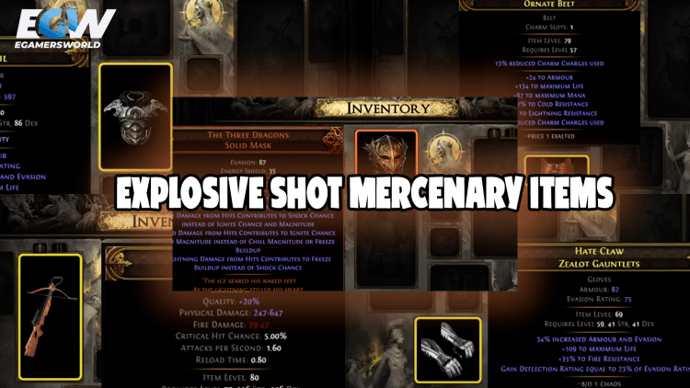
Now let’s talk about the equipment we’ll need to gear up with.
For weapons at the start, a rare crossbow with at least 500 DPS and a +3 bonus to the level of projectile skills will do. This provides a great damage boost for a relatively low cost. Once you have more currency, you should switch to a crossbow with 700+ DPS and the same skill level bonus — the difference in damage is immediately noticeable.
With armor, the situation is similar: the budget option is a rare body armor with at least 700 armour and evasion, 100 life, and some basic resistances. But if your finances allow it, look for a version with 1000+ armour/evasion without losing life and resistances. This makes your character much more durable.
A mandatory element of the build is the Three Dragons helmet. It completely changes the mechanics of elemental damage: fire starts to shock, and lightning freezes. Without it, the build won’t unleash its full potential in both control and damage.
Gloves and boots are best taken as rares — with at least 100 life, armour, evasion, deflection, and resistances. For boots, movement speed is also very important.
For rings, go for rares: the left one preferably with attributes, life, resistances, and mana on kill; the right one — with two different attributes, life, and resistances. These are flexible slots that help cover stat gaps.
The amulet should also be rare, with the main priority being a bonus to projectile skill levels (+2 minimum), some Spirit, and attributes. This directly boosts our main skill and helps balance overall stats.
The belt in this build should be rare, focusing on life and elemental resistances. A simple yet reliable choice that greatly increases overall survivability.
Next come the charms. The first charm is a stone one — it protects against stun. Thanks to it, the character doesn’t lose control in battle, while extra modifiers for duration and reduced charge cost make it very convenient.
The second charm is thawing. It grants immunity to freeze, which is crucial for builds where constant movement and quick reactions decide the outcome of fights. As before, the priority here is duration and charge efficiency.
The third charm is antidote. It removes vulnerability to poison, allowing you to safely handle content where this effect could otherwise be deadly. The logic is the same: duration and reduced charge cost.
Explosive Shot Mercenary Conclusion
In conclusion, I would like to say that this build is worth your time and attention. It is easy to learn and enjoyable to play. I also recommend checking out the Ranger Build - Critical Ice Shot. The gameplay is very similar, but it has its own subtleties and specifics.
And finally, here is a combination for boss fights. At the very beginning, you need to summon your Cannon, then apply the Elemental Weakness Curse and Voltaic Mark on the Boss. After that, immediately use Explosive Shot to apply Shock. And in the end, you need to activate the Emergency Reload buff and use Shockburst Rounds to deal a lot of damage. After this combination, almost any boss will instantly be sent to the afterlife.
Of course, this guide can be adjusted in any way that is more convenient, comfortable, and enjoyable for you. The game allows you to experiment and develop your builds in different directions. So don’t be afraid to try something new and enjoy the gameplay.

Kirill is a writer of articles and blogs at eGamersWorld, having joined the team in 2024. His primary focus is analytics and crafting content about esports. With years of experience in gaming, Kirill brings deep industry insights to deliver high-quality and engaging materials.


 ESL Pro League Season 23 Stage 2 PreviewESL Pro League Season 23 Stage 2 begins March 6 with 16 teams in a Swiss format. See the favorites, dark horses, and where to watch the matches.
 League of Legends Events Schedule in 2026Explore the 2026 LoL competitive calendar. Get the latest on tournament formats and dates, from regional leagues to Worlds in New York. Your guide to the entire 2026 League of Legends season.
 Sekiguchi Marathon Faction: Contracts, Upgrades, RewardsDiscover everything about the Sekiguchi Marathon faction: contracts, upgrades, rewards.
 Full Breakdown of the Shyvana VGU: New Abilities, Release Date, Everything We KnowFull breakdown of the LoL Shyvana rework. Check out her updated skills, including new true damage and healing, plus the release date and Riot Games' plans for the game.
") BTC Gaming
BTC Gaming