How to Make Clothes in Roblox

Roblox is fascinating not only for its huge collection of mini-games across all genres but also for the ability to customize your character to your liking. One of the most interesting ways to express your style is by creating clothes — there are tons of options available, and you can even design your own. In this blog, we’ll tell you how to make clothes in Roblox, from choosing templates to publishing them in the Roblox Catalog.
Basics of Creating Clothes in Roblox
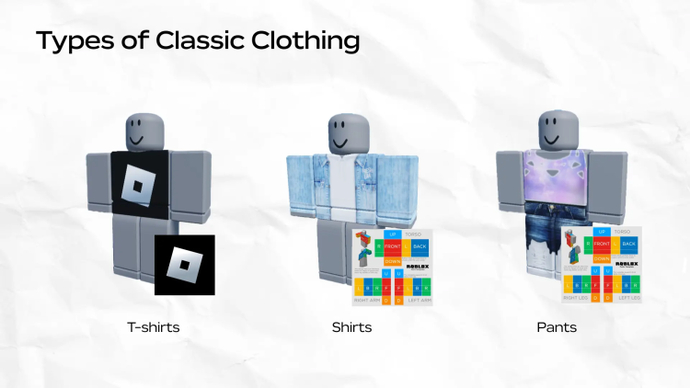
Roblox offers a huge variety of clothing items and accessories that can be purchased in the store. Players can create two main types of clothing on their own:
- T-shirts — the most popular and simplest option, consisting of a single image applied to the character’s torso.
- Shirts and Pants — slightly more complex to create and require templates and precise texture placement.
To create Roblox clothing, you need to have Roblox Premium, which, in addition to allowing you to upload and sell your own clothing items in the Avatar Shop, also provides a bunch of extra features.
Template and Design
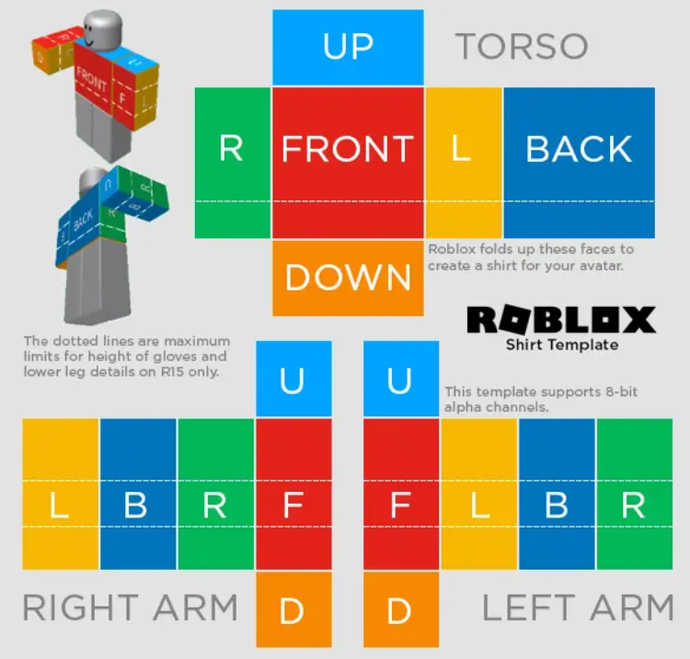
Let’s move on to the step-by-step guide on how to make shirts and pants in Roblox. To begin, find the design you want and download the templates.
- Log into Roblox and go to Avatar (left-hand menu)
- Click Clothing → Shirts
- Press the Create button
After that, select the type of clothing you want to create and download the appropriate templates. Open the template in any graphic editor and, following the guides, place your image on the correct parts of the template. Save and upload the file.
Tip: use layers — this will help you stay organized with your design and make it easier to add small details.
How to Upload Your Clothes to Roblox
Once your design is ready, it’s time to upload it to the game.
- Log into your Roblox account.
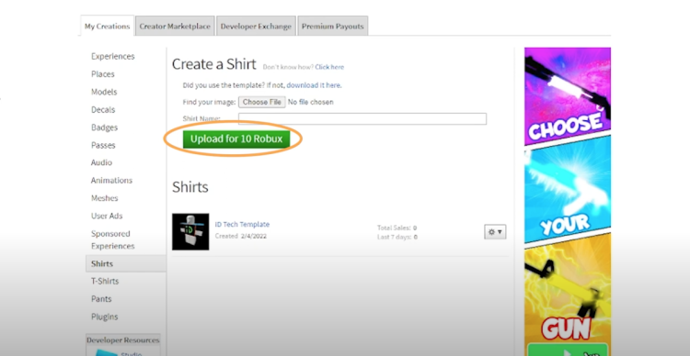
- Open the Create page.
- Choose Shirt, Pants, or T-shirt — depending on what you created.
- Click Upload and select the required PNG file.
After uploading, your clothing item will appear in your Inventory, and you can test it on your avatar.


How to Add Clothes to the Roblox Marketplace
You can use the clothes you created yourself, or you can upload them to the Roblox Marketplace and earn Robux. To upload your item, follow these steps:
- Go to Avatar → Clothing → Shirts
- Find the clothing item you uploaded
- Click the gear icon next to your shirt
- Select Configure
Enable Sales & Set a Price:
- Click the Sales tab
- Toggle Item for Sale to ON (it should turn green)
- Set a price in Robux (minimum: 5 Robux)
Uploading a clothing item to Roblox costs 10 Robux. There’s also a 10 Robux sales fee charged when the item first goes on sale. This applies to T-shirts. If you want to save some Robux, we recommend reading our article How to Get Robux for Free, where you’ll learn the best ways to earn Roblox currency without spending money.
When your item sells, ROBLOX takes a share of the purchase. For T-shirts, shirts, and pants, the ratio is 70/30, meaning the clothing creator receives 70% of the revenue.
Final Thoughts
In this blog, you’ve learned how to make clothes in Roblox — from downloading templates to selling your creations in the store. This process is creative and doesn’t require professional skills, so anyone can design unique outfits. Moreover, if you’re interested in How to Trade in Roblox, that guide will also be useful for you. By creating your own Roblox clothing, you can design a one-of-a-kind character and unlock new opportunities on this gaming platform.

Ostapchuk Dmytro – writer at EGamersWorld, ESports & Gaming Specialist
Dmytro started working at EGamersWorld in 2024 as a writer and later became a blog editor. His main focus is on esports disciplines Dota 2 and CS2. His tasks include finding topics that interest EGamersWorld readers and covering game updates, their features, and major esports tournaments.
Dmytro has recently begun working in this field, so he is learning a lot and making noticeable progress in this direction.


 How To Unlock All Mounts Added In Patch 1.01.00 For Crimson DesertCrimson Desert Patch 1.01.00 adds five permanent legendary mounts. Here is how to unlock every one of them.
 VCT 2026: EMEA Stage 1 OverviewThe professional VALORANT season in EMEA continues with VCT 2026: EMEA Stage 1, the first major regional stage following the Kickoff events.
 Legendary Silver Fang Wolf Permanent Mount in Crimson Desert: How To GetCrimson Desert Legendary Silver Fang Mount Guide: location, quest requirements, stats and benefits.
 Vaporizer in ARC Raiders: Overview of the New ARC in the Flashpoint UpdateThe Vaporizer is a fast, flying ARC enemy in ARC Raiders’ Flashpoint update, adding challenge and variety to raids.